Task 1- Overview
1. Getting to Powerpay
2. Make it a Favorite
3. Logging On
4. The Powerpay Screen
5. Getting Help
6. Saving Data & Printing
7. Logging Off
Task 2-Company Setup
1. User and Contact Management
2. Calendar
3. Deduction and/or Contribution Cycles
4. Department Names and ID Fields
5. Timesheet Defaults
6. Sort/Filter Defaults
7. Rapid Entry Setup
8. Set up New Hire Defaults
9. Set up Second Payments
Task 3-Employee Setup
1. Pay Period
2. Employees
3. Direct Deposits - Setup
4. Rates, Factors, Earnings - Setup
5. Special Stat. Ded. Considerations - Setup
6. Deductions & Contributions - Setup
Task 4-Payroll Entry
1. Select Pay Period
2. Reversals
3. Manuals
4. Employee Status
5. Employee Profile
6. Direct Deposit - Edit
7. Rates, Factors, Earnings - Edit
8. Payments
9. Deductions & Contributions - Edit
10. Special Tax Considerations - Edit
11. Verify
12. Preview
13. Submit
14. Reports
15. Log Off
Extras
Misc A. Wage Garnishment
Misc B. Year-End Adjustments Run
Misc C. Record of Employment Run
Misc D. Employee Pay Statement Messages
Misc E. Pre-Authorized Debit and Change Banking Information Forms
Back
|
Next
Step 14. View Online Reports (Optional)...Continued
How do I get there, and what does the screen look like?
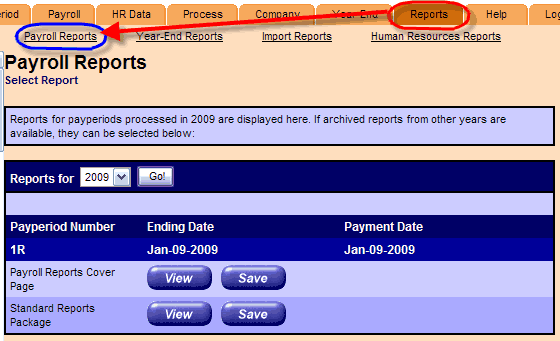
Click on the
Reports
tab and click the
Payroll Reports
link.
© 2008 Ceridian Canada Ltd. All rights reserved.
Back
|
Next
Task 1
Task 2
Task 3
Task 4
Extras